A website is one of the most important business assets that will help grow your small business. For customers, this is where they come first to learn more about your business.
Once people visit your page, you’ll need to know what users do when they land on your website. There could be hidden traps that are driving them away. You can add Google Analytics to your website in order to know where visitors came from, which pages they visited and how long they stayed. But when used alone, Google Analytics or other tracking codes do have their limitations. This is where Google Tag Manager comes in.
What Is Google Tag Manager?
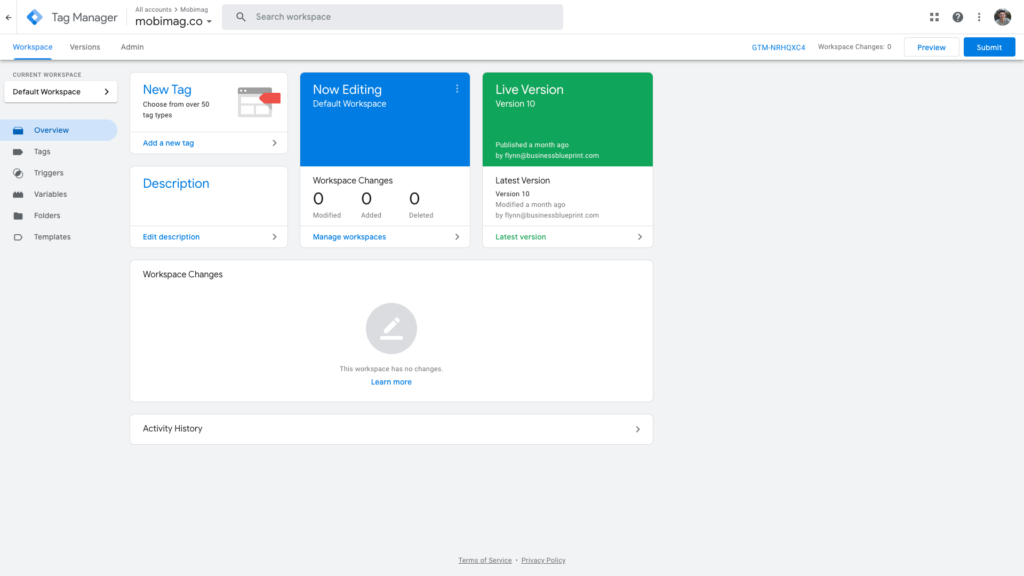
Google Tag Manager is a free service offered by Google to quickly and easily manage tags on the back-end of your website from a single dashboard. These tags include:
- Google Analytics
- Google Optimize
- Facebook Pixel
- Hotjar
- Event tracking

Why Should I Use Google Tag Manager?
First, it’s free, which is a good thing for a small business owner.
Since Google Tag Manager codes the tags for you, it also eliminates the burden of coding each individual marketing tag. Giving your developers and IT department more time to focus on bigger-picture tasks.
And third, Google Tag Manager reduces the possibility of human error and improves the accuracy of your analytics system. This means you can generate higher-quality reports and better understand your audience.
Finally, it helps keep your website code tidy and load time as fast as possible. By storing all your tracking codes in one container, it means you’re not bulking up your website with different codes and plugins.
How to Setup Google Tag Manager
Google Tag Manager is free, so you can try it out and see if it’s right for your business. Here, we’ll show you how to create an account, how to set up a container, how to embed the Google Tag Management code in your website, and how to use Google Tag Manager with your Google Analytics and Google Optimize account
Create a Google Tag Manager account
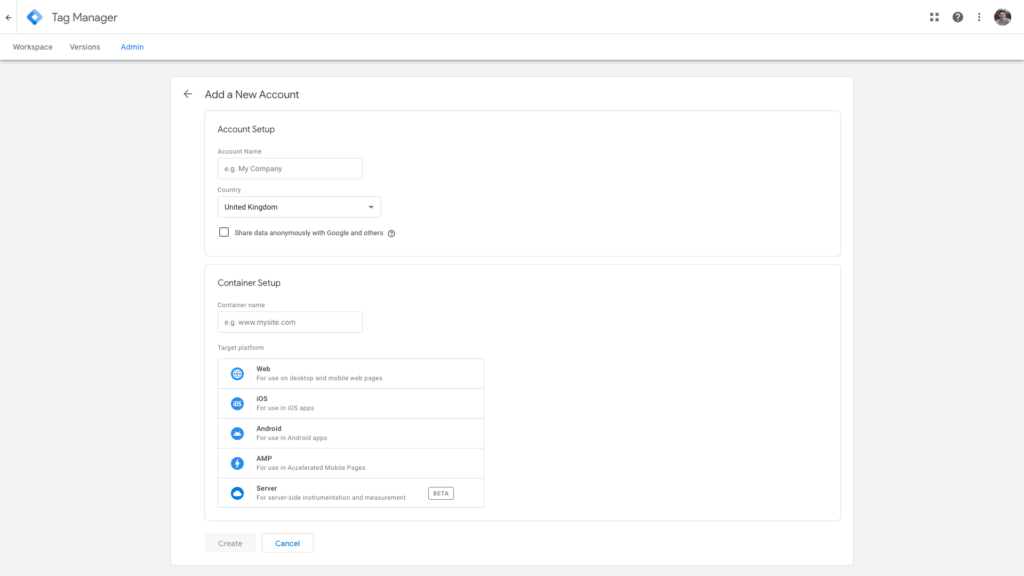
Go to the Google Tag Manager and create an account, or use an existing account. Input your account name (company) and country.

Create a container for your website
On the same page, it will ask you to set up a container. The container name can be the name of your website. Then choose where you want to use Google Tag (Web, iOS, Android, AMP, Server). When you’re finished, click the blue “Create” button.
Add the code to your website
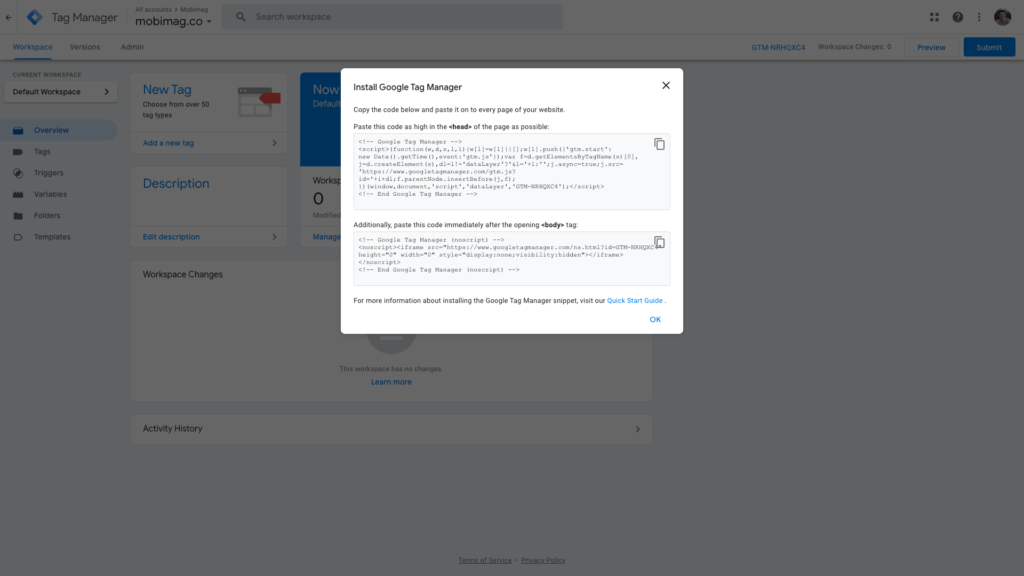
The next step is adding the Google Tag Manager code to your website. You’ll be given codes and instructions to include one code high in the
of your page, and the other after the opening tag.
These JavaScript and non-JavaScript codes enable Tag Manager to fire tags by inserting gtm.js into the page (or through the use of an iframe when JavaScript isn’t available). Make sure to put the codes in the sections mentioned otherwise your tracking codes may not work accurately.
Here are the steps on how you can add the Google Tag Manager to your WordPress, Squarespace and Custom HTML:
Adding Google Tag Manager code on WordPress
If you’re using WordPress to host your website, here’s how to integrate Google Tag Manager into WordPress.
- Install and activate the Insert Headers and Footers plugin.
- Upon activation, you need to visit Settings » Insert Headers and Footers
- Paste your tag manager code in the header section
- Click on the Save button to store your settings
Adding Google Tag Manager code on Squarespace
- Log in to your Squarespace account
- Select the website that you want to add Google Tag Manager to
- On the sidebar click Settings > Advanced > Code Injection
- Paste the GMT code snippets into the header and footer field
- Click ‘Save’
- Finally, check and see if everything is working properly
Adding Custom HTML tags
If you want to use tags that are not yet supported natively by Google Tag Manager, you can create a Custom HTML tag. This code will be provided to you by the tag vendor. Follow these steps to create a new Custom HTML tag:
- Sign in to your account
- Click Tags and then New
- Click Tag Configuration and select Custom HTML.
- Copy and paste the tag code provided by the vendor into the HTML field, or enter your own custom HTML or JavaScript code.
NOTE: Always place JavaScript inside HTML tags.
Add Google Analytics to Google Tag Manager
Embedding tags in your site will increase the precision of your Google Analytics reports. To add Google Analytics, follow these steps:
- Open your Google Tag Manager dashboard and go to Tags
- Create a new tag. You can name it “Google Analytics”
- Click on the tag configuration section
- Select the Universal Analytics option
- Choose the ‘Select Settings Variable…’ and ‘New Variable’
- Add your Google Analytics Tracking ID
- Click ‘Save’
- Select ‘All Pages’ in the ‘Triggering’ section
- Click ‘Save’
After publishing to your site, Google Analytics tracking is live.
NOTE: After adding your Google Analytics code to your GTM container, remove your Analytics code from your website. Otherwise, it’ll just report everything twice and mess up your data.
Add Google Optimize to Google Tag Manager
Before you configure Google Optimize in Tag Manager, make sure that you have your Analytics tracking ID and Optimize container ID. Then, you’ll need to ensure your Tag Manager and Analytics tracker settings use the shared Google Analytics Settings variable.
Once you have the information above, follow these steps to configure Optimize in Tag Manager:
- Sign in to Google Tag Manager.
- Click Tags and select New.
- Click Tag Configuration > Google Optimize.
- Enter your Optimize container ID.
- Select a Google Analytics Settings variable.
- Save the tag without triggers.
- Next, open the Analytics page view tag for the Analytics property linked to your Optimize container.
- Click Tag Configuration > Advanced Settings > Tag Sequencing.
- Check the box to fire a tag before this tag fires.
- Under the Setup Tag heading, click the menu and select your desired Optimize tag.
- Configure the Optimize tag to fire once per page, then click save.
- Publish your Tag Manager container to save the changes.
Note: The pageview trigger must be configured in the Analytics tag that will fire the Optimize tag.
If you want to be more efficient and grow your small business without breaking the bank, Google Tag Manager is the perfect tool that can help you achieve both of those things. If you’re not using this Google Tag Manager, it’s time to get started. Hopefully, this guide will help you set up a Google Tag Manager for your small business.


